Create a professional Blogger blog (detailed guide) 2024

Why Blogger?
Before creating a blog is always the most important, as the foundations upon which your home is built are the most important step that you must take care of, and your foundations in the field of blogging are ideas and hard work. In order to create a blog, whether it is Blogger, WordPress, or on any other platform, you must first conjure in your mind a clear image of what it looks like. Your blog. I know that you are here to find simple steps to create your own Blogger blog, but if you do not keep that clear image in your mind, you will never succeed in this field, and it is better not to enter it in the first place.
Now you have reviewed an image of your blog and chosen the topics that you will write on your blog, right?!
– Go now to Namecheap and buy a domain for your blog at a price of $8.5 per year (the domain is the name of the site, for example, google.com – facebook.com).
The domain is very important in many matters that we will mention in advance, whether profit or professionalism.
– After you have purchased the domain for your Blogger blog, let us now move to:
Steps to create a professional Blogger blog
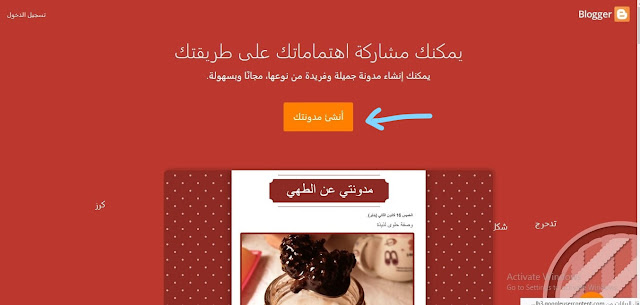
In order to create a free blog on Blogger, type blogger on Google or go to it through this link
to Blogger , and this window will appear for you.
* Click on
Create your blog* A window will appear asking you for your email and password. Write them to display this window.
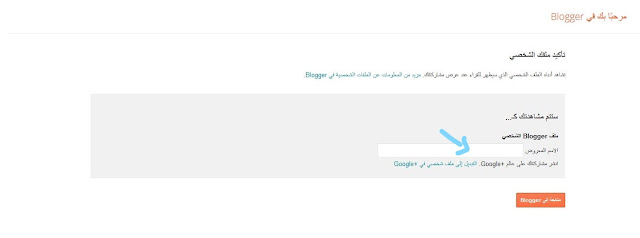
* In the place indicated by the blue arrow, write your name that you would like to appear to readers on your blog
* Then click on Continue to Blogger
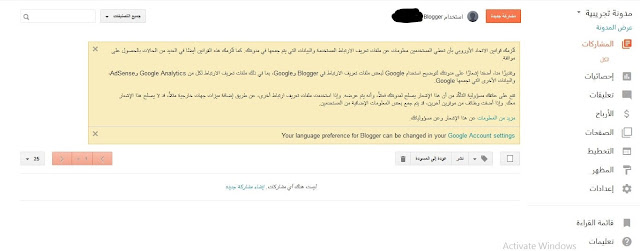
After clicking on Follow to Blogger, the following window will appear for you
* Click on Create a new blog indicated by the blue arrow.
3 – Choose a name for your blog and a link to your blog.
This step, although simple, is very important if you will continue blogging with a free domain (which I do not recommend at all).
In this step, you will choose a name for your blog, which is like the name of the blog you are reading now (Profit Expert), and you will write this name in the (Form Name) box.
After that, we will choose a subdomain (a free Blogger domain). If you want to create a professional blog, do not You must continue with this domain, but if you do not have the money to buy the domain, I advise you to earn some money and then start blogging when you buy the domain, but in this case we will choose to add a domain, and if you buy a domain, there is no importance for this domain name, so choose anything .
In place number 1:
Write the name of your blog* When choosing a name for your blog, it is preferable that the blog not be in your personal name and that it be related to the field in which you write. However, if you are going to use the blog as a marketing project for you, it is preferable that it be in your personal name.
* It is also preferable that the name be easy so that visitors can remember it.
4- Choose a template for your blog.
Choosing a professional template is the most important step now to appear professional. The template is the appearance that your followers see. Imagine with me now that you enter my blog to find the elements overlapping and you cannot reach what you want or the colors are inconsistent. You will exit and will not return to it. Once again right?!
This is what you should think about now. A professional blog appears professional from its appearance because that is the first impression of the visitor. You liked my blog when you entered it. I am sure of that, and therefore I strongly invite you to pay attention to the template of your blog and choose the appropriate template.
In place number 3(in the picture above): Choose a default Blogger template for your blog. You can change the template for your blog at any time after that.
Adding a professional template now is the basic step that we need to focus on, but after creating the entire blog.
At number 4:
Click on Create a blog to display this window
– Now all you have to do is go to one of the template sites , buy one of the professional templates, and install it on your blog. Thus, you have created a professional Blogger blog, and all you have to do now is start blogging and publishing good content. You can choose one of the professional Blogger templates from this list. Choose what suits you and purchase it, or download the free version and start using it. After you have purchased or downloaded the template, now go to how to install the Blogger template correctly
Explaining the Blogger platform from the inside with pictures
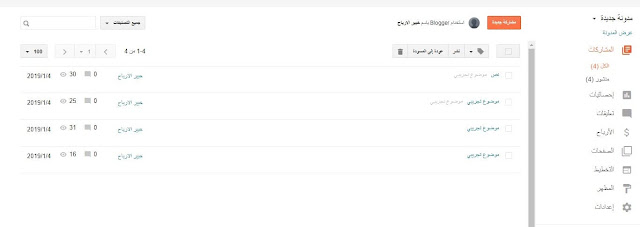
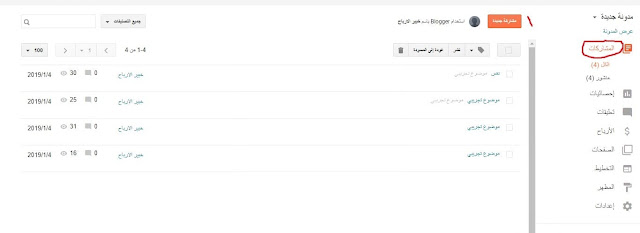
These settings are located inside the Blogger platform
When you enter the posts section, you will find as shown in the image above
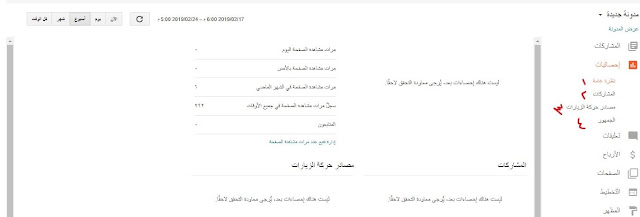
approximatefor your blog, but so that you get accurate details regarding visits. You mustregister in Google Analyticsto get the full picture
In this part, you can identify the source of visits from which visitors come, whether from the search engine, social networking sites, or other sites
3- If you activate the option to moderate comments (activated from the settings) that come to your blog, you will find a third box known as Waiting for Moderation (it is moved to the published comments after approval)
* After selecting the comment, you can remove the content of the comment through the word Remove Content (That is, it will appear that there is a comment, but the content has been deleted)or you can delete the comment using the word delete (in which case the comment will not appear in the first place)
4- Profits section
Through this section, you can submit a subscription request to Google AdSense to place ads on your blog and
start profiting from your Blogger blog.All you have to do is click on the AdSense subscription button and then follow the steps, but let me tell you that it is important in the beginning that you make sure to provide content. It is very useful for your visitors and does not violate the terms of
Google AdSense.5- Pages section
 |
About the blog
Contact us
Privacy policy
Terms of use
* All you have to do is click on the word “Create a new page” and write the content of the pages you want to add.
* If you create a page and do not publish it, you will find the word draft and it contains the page that you have not published yet
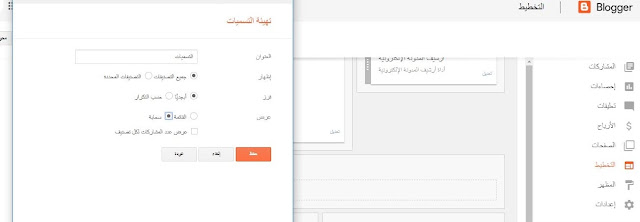
6- Planning Section
 |
Through this section, you can modify and make all changes to the form of the template, but the layout differs from one template to another, so we will not talk about it much.
* After modifying the template and wanting to preview the template’s appearance, you click on Preview to see the new appearance.
* If you like the modifications to the blog, click on Save Arrangement so that the modifications you added will be applied.
7- Appearance Section
 |
| Explanation of appearance in Blogger blog |
Through this section in the blog, you can change the template and take a backup copy of the template in case any problems occur while changing the template
* You can also change the colors of the template through customization
* You can also choose a template from the templates for Blogger, but I advise you to go to one of the
professional template sitesand Choose a professional template for your blog for free.
Explaining how to adjust the settings of the Blogger platform from within
Basic settings
In the two images above, you will find a set of basic settings for the Blogger platform, which is very important to understand each one of them:
1- Title
The title of the blog that will appear to visitors, such as the title of this blog (Profit Expert).
It is preferable not to change the name of the blog many times because it affects archiving.
2 Description:
In this field, you write a description for your blog, such as (a blog that specializes in blogging), (a blog that specializes in movies), or something else.
It is worth noting now that the blog description is very important, especially when people search for your blog, because it appears under your blog name.
3- Privacy
This feature is considered one of the most important features that you must activate. Through this feature, your blog will appear in the search engine, and thus you can
get visitorsfrom the search engine4- Blog title:
In this box you will find the link to your blog and you can change it.
Changing the link to your blog will negatively affect archiving if you have many topics and lead to many broken links.
5- Redirection
is one of the most important features that you must pay attention to and activate
. * Through it, the safe browsing feature is provided and thus the visitors’ data is preserved.
It has become one of the very important things for Google and other search engines.6- Electronic blog authors:
Through this feature, you can add other bloggers to your blog, especially if you are on the blog with a team working on
adding authors. You will allow them to write topics only, and they will not be able to edit the blog, delete topics, or anything, but if you want people, you can edit your blog. And others, modify their role through this section.
7- Electronic blog readers
: Through this feature, you can allow some people to read topics, allow everyone, or not allow anyone to read your topics, depending on your goal for that blog. Is it a private blog for specific people only or for everyone?
Posts, comments and sharing
1- Maximum messages.
Through this option, you can specify the number of topics that are displayed on the home page of your blog.
2- Posts form.
If you write a fixed introduction for all of your articles, you can write this introduction once in the posts form so that it appears every time you write a new topic.
3 – Displaying images in simplified mode.
By activating this option, the images in the posts will be shown on the home page.
4- Comments site:
By activating this option, the rectangle for writing a comment will be shown below each topic.
5- Who can comment
through this option? You can specify Who comments on your topics (anyone – anyone with a Google Plus account – blog members only)
6- Supervising comments
Through this option, you determine whether you want to moderate comments on your blog or not, which we talked about above.
If you choose to moderate comments (write an email to which the comments will be sent for moderation)
7- Show the verification word
If you choose to show the verification word, a captcha code (verification code) will appear for the person before sending the comment to confirm whether it is a person or a robot
8- Message Comment form:
Write a message such as (We are honored to help you – put your comment here) or other messages that appear to the person when writing a comment.
E-mail
1- Publish using an e-mail.
Through this option, you specify the e-mail through which you publish.
2- An e-mail to alert you to receive a comment.
Write an e-mail in that box to receive notifications
. 3- Send posts by e-mail to me.
Through this option, you can send New posts for your blog are sent to blog members, but the blog members must not exceed 10 members.
Language and formatting
1- Language:
Through this option, you choose the language settings for your blog.
2- Activate voice translation.
3- Time zone:
Through this option, you set the date and time zone in your country
. 4- Format the date header
5- Format the timestamp.
Through this option, you format the date (day/month/year) or (month/day/year).
6- Format the timestamp for comments.
Through this option, you format the date (day/month/year) or (month /day/year) but for comments, not posts.
An explanation of adjusting search preferences and other settings within the Blogger platform
Adjust search preferences in the Blogger platform
Search preferences within the Blogger platform are categorized into:
1- Meta tags
2- Crawling and indexing programs
3- Making a profit
Each of these sections contains a set of characteristics that you must adjust correctly so that no errors occur that affect the indexing of your blog or the search engine crawling of your topics.
1- Descriptive tags
* Description
You click on Edit and then write a custom description for your blog according to the field of your blog.
Always try to choose an attractive and short description
* Errors and redirections
* The custom page was not found
in this section. You can control the content of the message that appears to the visitor in the event of clicking For any link that is broken or not working at the present time,
click on Edit, then write the content of the message that you would like to appear to the visitor, for example
(Sorry, the page does not currently exist), (Sorry, the page you are trying to reach is currently not available), etc.
* Custom redirects
in This field can move the visitor from the non-existent or broken page to the main page or transfer him to the updated page if you have created a new page as an alternative to that broken page
2- Indexing and robot programs
Before starting to edit those sections in the Blogger blog, you will find a warning message with its content If you make any mistake while modifying these features, this will negatively affect the archiving of your topics and the search engine’s crawling of them.
If you choose to modify these features in your Blogger blog, carefully follow the instructions provided by the bloggers so that no errors occur
* Robot file.
Custom Txt
In a previous topic, we explained how to add a robot file.
Blogger
the correct way to
add this file.
Learn how to set the Android text file and header tags correctly
3- Making a profit
Ads.
Customized Txt, and we will talk about this topic in detail in an upcoming topic.Adjusting the other settings for the Blogger blog.
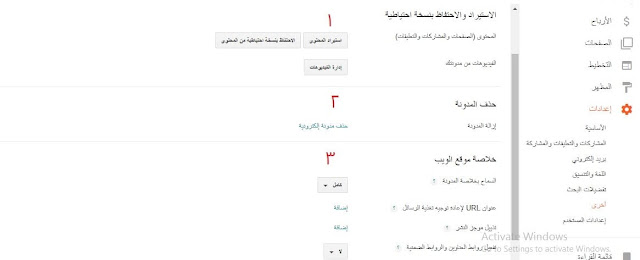
The other settings inside Blogger are divided into: –
1- Importing and keeping a backup copy
2- Deleting the blog
3- Website summary
4- Adult content
5- Connecting Analytics
We will now explain each use of these settings separately so that you simply understand the use of each of them and how to adjust them.
1- Import and keep a backup copy.
Through this option, you can take a backup copy of your blog in case you are making some changes to your blog and errors occur during this process.
You can Also manage your blog videos if you place videos inside blog posts.
2- Delete the blog.
Through this option, you can delete the entire blog.
3- Site
feed. Allow the blog feed
. By activating this option, you create a feed for your blog, and the benefit of that feed is that it collects new topics. In the visitor’s favorite blogs
* It is preferable to activate the (full) option when choosing the summary type, meaning that you publish the entire blog topics.
* As for the (up to the break) option, it means publishing the topics up to a specific part or the topic title.
* The (short) option is a part of the topic that is in the form of pictures and with some lines.
* The option (None) means not publishing any summary of your topics.
URL to redirect messages.
If you are using a specific site to make the summary, you place a link to this site.
Footer summary for publishing the summary.
Through this option, you can place an advertisement or something else at the end of the summary.
Activate the title links and implicit links.
Through this option, you have the opportunity to activate two types of links, namely:
Title links
, through which you can create titles dedicated to your topics.
Implicit links
and through them. Placing links to audio files or any multimedia files to appear with your blog feed.
When you activate this option, the links that people place in the comments are activated.
4- Adult content.
Through this option, you determine whether your blog contains adult content or not, whether sexual content or Violence or other information so that visitors are alerted to the content of the site
5- Link Analytics
Through this option, you put the ID of your site or blog in Google Analytics so that your blog is linked to your account in Google Analytics
Adjust user settings
General
Profile
Do you want your profile to appear to visitors? Through this option, you choose the profile you would like to appear, whether the profile in:
* Blogger
* Google Plus (Google Plus will be closed. Choose the profile in Blogger)
Use Draft Blogger
Language in Blogger
is the language you use in your Google account.
Steps to install a paid domain for Blogger
I will use a domain from the Namecheap site for selling domains because I prefer it and I think it is the best in terms of renewal and other features. These steps are similar in many domain buying sites, so do not worry. Just try to follow these steps with me in detail and with great focus so that… No errors occur.
1- Go to Namecheap and buy your domain.
The first step now is to buy your paid domain, and because I will be using a domain from Namecheap and I think it is the best, you may also want to buy from them, so go to Namecheap and search for the domain name. What you want, and if you find the domain available, all you have to do now is:
– Add the domain to the cart
– Create an account on the Namecheap website (if you already have an account, log in to your account)
– After that, all you have to do is complete the purchase process via Write your data and use your payment method, whether (Visa – PayPal), EasyPay Visa, mail, which can be used for Egyptians, and also Vodafone Visa Cash.
2- Go to the blog that you created and follow the steps in the image below
– go to Settings
– choose Basic
– then set up a third-party URL.
3- Then perform the steps in the image below
– In Step No. 1, write the name of the domain that you purchased preceded by WWW
– In Step No. 2, save it
– In Step No. 3, make sure to convert http to https (the blog’s security certificate, which is very important In order to appear in the search engine)
4- After that, this image will appear to you below
– Now that this step has appeared to you, you must go to your domain selling site in this example (we use Namecheap to install the domain)
– Copy those settings that are in front of them, the numbers 1 and 2, and put them in Text file
5- Now the steps for the domain website. Now go to the domain website from which you purchased the domain and follow the steps in the picture.
– Go to your list of domains
– Choose the domain you want to install if you have more than one domain
– Click on Manage to link your domain to Blogger
6- After that, the image below will appear to you. Execute the steps in it in detail
– after choosing your domain, go to Advanced DNS (Advanced Domain Name System)
– Mostly, you will find these two items as automatic settings for the domain. Remove the item for parking page and click On the option Add new record
7- When you click on add new record, this image will appear to you below
– In the first step, you choose the type of record, and what we will use are only two types: Cname record and A record
– In the second step, the type of host, and you will understand that in detail in the image below
– In the third step, the Target, which is where the visitor is directed, and it has a relationship with Blogger servers (the data that I copied and placed in the text file above, do you remember it?)
– In the fourth step, you save it after adding all the data
– and then after that, Add a new record so that we can add an element. last .
8- We will add 6 elements now as in the picture
The first and second element that you will add now are Cname record.
The first element
: In its host we add WWW, and in the target box we add the part in front of www in Blogger.The second element:In the Host and its target, we add the second line in the text file that you saved. The
other four elements that we will add are A record, and in their Host, we add @ to all of them and in the IP address field. We add these addresses for Blogger (Google), which are as follows
– 216.239.32.21
–216.239.34.21
–216.239.36.21
9- After adding all this data, go to Blogger now and click (Save). Your domain will be installed on Blogger, and you will find this image in front of you below.
How to write a topic on Blogger (preparing the platform before blogging)
* After entering your blog, you go to Posts, then New Post
* When you click on New Post, this interface appears in front of you
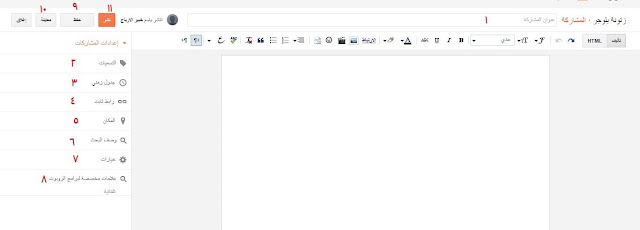
We will now explain the 11 features shown in the previous image
: 1- Post title:
After choosing the topic you want to blog about, you must choose a title for your article (preferably short and interesting) and then write it in this box.
2- Labels
: This feature is very important. In the event that you are writing topics in different fields and want to group them into groups,
for example
in the Zatouna Blogger blog, on which you are reading this topic now, there are topics on (Blogger – correct blogging – SEO – profit from your blog – etc.) Each of these labels includes A group of similar topics that are related to each other.
You will need these labels to add categories to the main menu at the top.
3- Timetable:
Through this feature, you can postpone publishing one of the topics, or if you are writing several topics a day and do not want to download all the topics. On the same day, you can archive these topics and choose the time of their publication in the day and hour.
4- A fixed link.
Normally, when publishing any blog post on Blogger, a special link for blogging is chosen and it is in the form of a number next to the blog link.
This link is not preferred by search engines
, so we have to write the link ourselves according to the type. The topic we write
, for example
a blog post about the best foreign films,
will often appear with a link at the end (blog-post) and a number next to it, but we will change it as follows:
* We choose the option (custom fixed link)
* Then we write the link ourselves in English as follows:
best-english -films so that this is the link to the topic.
Note that I separated each word from the other with (-)
5-
LocationThrough this feature you choose the place from which you would like to get visitors to your topics
* If you are targeting visitors from Egypt, then choose Egypt
* If You are targeting visitors from the United States, choose the United States
* If you want your topics to reach anyone, do not specify the location
6- Description of the research
This feature is considered very important when you write the topic
* If the description of the research that you are writing is good, it will appear to the visitor under the title The topic in the search engine
* Do not copy part of the article and put it in the search description, but write some simple words about the topic you are talking about
* Do not repeat sentences in the search description
* Use some of the keywords that you target in the search description
* Preferably a description The search is not short and not long
7- Options
Through these options you can:
* Allow readers to comment on topics
* Do not allow comments on topics
* Set the creation mode for the topic
* Adjust line breaks
8- Custom tags for robots
It is preferable not to change these tags unless the topic you are writing does not want to be archived by search engines or the topic or other characteristics are not translated. In this case, you can change and activate the tag that you want search engine robots to follow.
9- Save
in The Blogger platform automatically saves topics every period, but through this option you can save the topics that you write continuously so that they are not lost in the event of exiting the blogging interface, a power outage, or other malfunctions and problems that may occur while writing on the platform.
10- Preview
after completion When writing a topic on the Blogger platform, you want to know how this topic appears to the reader. When you click on the preview button, the topic appears to you as it appears to the reader, so you can preview and find out whether it contains any errors?
Or is the format appropriate and are the colors good?Is the font size appropriate?Etc.It is very important to preview the topic before publishing it and know whether it is good and comfortable for the reader or not.
11- Publish
After finishing writing the topic, previewing it, and coordinating the link to the topic, now comes the time to publish the topic, which is very easy. As soon as you press the publish button, the topic is published and it is ready for everyone to see. Readers
Explanation of the toolbar for blogging on Blogger
Each feature in the toolbar is sufficient to place the cursor on it to know its function.
When you enter the Blogger platform and choose a new post, the interface for writing the topic on Blogger will appear and it has the toolbar, which is like the one in that picture.
Quotation of a sentence
7- Through this option, you can create bullet points for a group of sentences
8-
Create a numerical enumerationfor a group of sentences9- Through this option you can choose
the format of the paragraphor topic* Align paragraphs to the right
* Align paragraphs to the left
* Center the text
10- Through this option you can create a break
between paragraphs and each other
11- Through this option you can Place an emoji 😂, an arrow symbol, a square, or other symbols
12- Through this option, you can
put a videoin the blog post, whether the video is:* From your device
* From the videos on your YouTube channel
* Any video on YouTube from other channels
13- Through this option, you can
insert and place imagesin the blog, whether that image is* from the images in the blog
* from the images on your device
* from the webcam
* from your phone
* an image from the URL
14-
LinkingThrough this option you can place external links or Internal to the post to refer to another topic related to this topic and has a relationship with it
* You can make this link open in a new page or not
* You can make the link Nofollow or Dofollow according to your desire
. If it is a link to any external site, make it Nofollow, but if it is to any topic of your blog Make it Dofollow
15- Through this option you canshade the textand choose the shading color you want
16- Through this option you can
choose the color of the textyou want to write in, whether black,red,blueor other colors17-
Make a line in the middle of the speechIn case you want to cancel a specific part of a topic and do not want to delete it,18- Make
a linebelow the words.19- Make
the writing lineitalic. 20- Make the line
bold andclear. 21- Determine
the subtopic and secondary headings for the topicheadings, and we will talk about them in detail in the upcoming topics.22-
Choose the font size* small
* large
* very large
23- Choosethe font typethrough this option
How to adjust the main menu in Blogger blogs
Did you like the topic?
If you like these steps to create a professional Blogger blog, share them with others so that they can also start blogging.


